The Placement Rule That Does Not Move
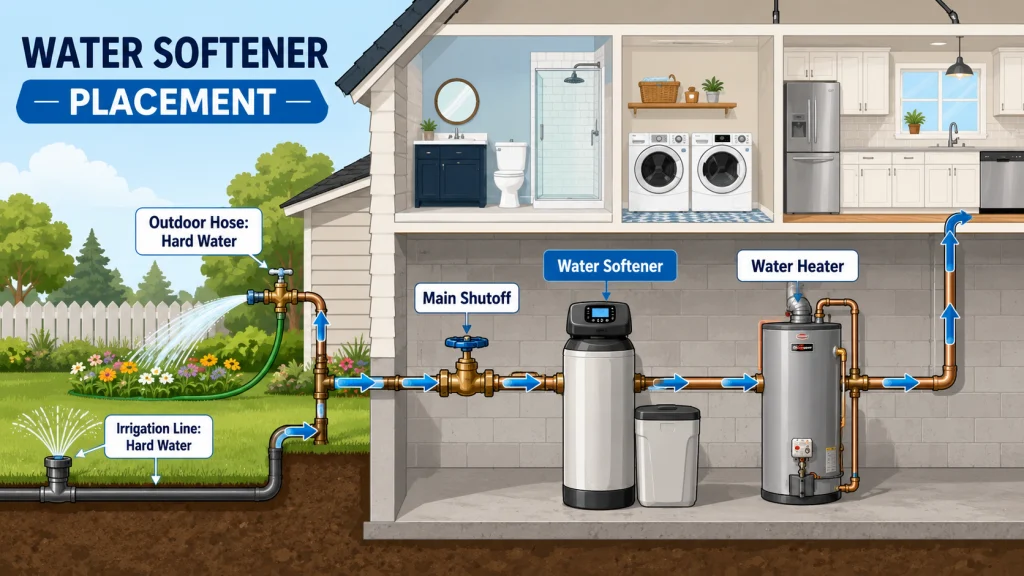
The softener goes after your main water shutoff and before your water heater. That position puts it on the main supply line before the water splits into hot and cold distribution, which means every indoor fixture that should receive softened water gets treated water. Move it further downstream and you start losing coverage. Rooms on a branch that runs before the softener will see hard water, and your water heater, which is one of the things a softener is most useful for protecting, may not be covered at all.
Most homes have a clear place for this. The main shutoff is usually where the supply line enters the house: at the foundation in a basement, inside a utility closet, or next to the pressure tank in a well-water home. That is the zone you are working in. The softener connects directly into the main line at that point, with a bypass valve so you can take it offline for service, repairs, or troubleshooting without cutting water to the whole house. If you want a practical sense of what the full installation process involves before you start, that context is worth reading first.
One addition for well-water homes: the softener goes after the pressure tank, not before it. In a well system, the pressure tank should stay upstream of the softener so the pump and pressure switch operate on the untreated supply before water enters treatment. The entry point rule still applies, just with the pressure tank as the starting reference instead of the main shutoff.

Built around a patented ceramic disk valve that resists abrasion and corrosion without seals or rebuild kits, this full-size system comes preloaded with 1.5 cubic feet of cation resin in a 10 by 59-inch mineral tank paired with a 13.5 by 32-inch salt tank for high-capacity performance. Usage-based metered regeneration only activates when needed, reducing excess cycling and salt waste for households with higher water demand. A included sediment pre-filter and softening process work together to reduce scale buildup in water heaters, dishwashers, washing machines, and plumbing fixtures over the long term.
Check On AmazonIf you click this link and buy, we earn a commission at no additional cost to you.
The Hose Bib Rule: What Your Lawn and Garden Actually Need
This is the installation detail that does not make it into most guides, and it is the one I have seen cause the most avoidable problems. Every outdoor hose bib, irrigation zone, and garden spigot on the property needs to be plumbed upstream of the softener, on the hard water side, before the treated supply.
The reason is sodium. Softened water contains elevated sodium from the ion exchange process. For most households, that sodium level is acceptable for normal indoor use, but it is not fine for soil. Applied to a lawn or garden repeatedly, it accumulates, breaks down soil structure, and stresses or kills plants over time. Grass stops recovering. Vegetable gardens underperform. Established landscaping starts declining in ways that are not immediately obvious because the water looks and smells completely normal. What I have seen more than once is a homeowner who watered their garden with softened water through an entire growing season and spent the next one wondering why things were not coming back.
If your home is already plumbed with all outdoor hose bibs downstream of where the softener will go, the fix is to reroute those lines off the main before the softener connection. This is worth doing before the softener goes in, not after. A plumber can handle it at the same time as the install, and the cost is far lower than redoing the work later.
Car washing is a secondary consideration here. Soft water is not usually necessary for car washing, and running it through a high-volume hose burns salt capacity quickly. A hard water hose bib upstream of the softener handles this without any additional hardware.
Field Note: The hose bib upstream rule is the single most common placement mistake I see on existing installations. It is not in most owner manuals and it is rarely mentioned by dealers. If a plumber is doing your install, confirm they understand this before the pipework starts, not after.
Inside vs Outside: Why Temperature Matters More Than Convenience
Install the softener indoors whenever possible. The brine tank dissolves salt to create the regeneration solution, and that process slows significantly as temperatures drop. Below freezing, salt stops dissolving correctly and regeneration cycles become unreliable or incomplete. The resin bed itself can also be damaged by sustained freezing: resin beads are porous, and water that freezes inside them causes cracking that reduces effectiveness over time. Most manufacturers specify a working range somewhere between 35 and 100°F, and heat above that range degrades resin faster than normal wear would.
Outdoor installations are done in mild climates and work fine where temperatures stay reliably above freezing year-round. If your climate sees freezing temperatures even occasionally, an outdoor unit needs proper insulation wrap and a protective enclosure to function through winter. This is doable but it adds cost and ongoing maintenance that an indoor location avoids entirely. If you have a choice between a slightly inconvenient indoor location and an easy outdoor one, the indoor location is almost always the right answer.

This heavy-duty cover features a 3-layer construction combining waterproof 600D Oxford cloth on the outside, antifreeze insulation cotton in the middle, and an antifreeze aluminum foil inner layer to protect your softener from freezing temperatures, rain, snow, and UV damage year-round. Available in three sizes, 9 by 48 inches, 10 by 54 inches, and 12 by 52 inches, it fits most standard tanks and installs in seconds with a waterproof zipper closure. Measure your unit carefully and choose a size slightly larger than your tank for the best fit.
Check On AmazonIf you click this link and buy, we earn a commission at no additional cost to you.
Basement, Garage, Utility Room: Which Location Actually Works
The location that works for you depends on your home’s layout, but some options are clearly better than others. Here is how each common location stacks up:
| Location | Works? | Key Considerations |
|---|---|---|
| Basement | Best option | Temperature stable year-round, usually close to main line entry and a floor drain. Easiest drain and electrical access. |
| Garage (attached) | Common, works well | Fine in mild climates. If temperatures drop below 32°F regularly, salt will not dissolve reliably. Insulate or use a heated space instead. |
| Utility room | Good | Confirm floor space for both tanks plus clearance above the brine tank to load salt bags. A 40-lb bag needs room to maneuver. |
| Utility closet | Possible | Salt bag access is the limiting factor. Measure the door width and overhead clearance before committing to this location. |
| Crawlspace | Avoid if possible | Access for routine maintenance, including salt loading, cleaning, and troubleshooting, becomes a real problem. Save crawlspace installations for situations with no alternative. |
| Outdoors | Last resort | Mild climates only. Requires insulation and an enclosure anywhere temperatures approach freezing. |
The basement is where I prefer to see these units installed. The main supply line typically enters the house nearby, there is usually a floor drain within reach, and ambient temperature stays stable enough year-round that salt dissolving and resin performance are consistent. Garages are the practical alternative for homes without a basement, and they work well in most of the U.S. The main risk is winter temperatures in colder climates. If your garage drops below freezing for extended periods, either insulate the unit heavily or find an interior location instead.
For utility rooms and closets, the real-world check is salt access. Most softeners use 40 to 50-lb bags of salt, and you will be lifting and positioning those bags every few weeks. If your closet door is narrow or the space above the brine tank is limited, you will notice it every time you load salt. Measure the access before you finalize the location.
Before You Buy or Schedule the Install: Five Things to Confirm First
Placement problems are easiest to solve before you order the softener, not after it arrives. Most of the issues I see on existing installations, including hose bibs on the wrong side and drain lines that are too long, could have been caught in a five-minute walkthrough of the utility area. Before you commit to a location, verify these:
- Find your main shutoff or pressure tank. That is the upstream reference point. The softener goes just downstream of it.
- Trace your outdoor hose bibs. Follow the pipe from each outdoor spigot back to where it branches off the main. If any of them branch after your intended softener location, those lines need to be rerouted upstream before the softener goes in.
- Measure the drain path. Locate the nearest floor drain, utility sink, or laundry standpipe. Measure the total distance the drain hose would need to run. If it is over 20 feet, or if there is a long horizontal run before the drop, you may need to plan for a drain closer to the unit.
- Confirm a grounded 120V outlet is within reach. Most control head power cords are 6 to 8 feet. If no outlet is close, plan for an electrician to add one at the same time as the install.
- Check salt bag clearance. Stand at the intended location and confirm there is enough overhead clearance to open and tip a 40 lb salt bag into the brine tank. If the space is tight overhead or through the door, find out before the unit is placed.
Running through this list before anything is ordered saves the kind of problem that shows up the day of installation, when the plumber is already there and a reroute adds hours and cost to the job.

This kit lets you test drinking water, pool water, or any water source in seconds using a simple dip-and-read method with an oversized color chart ranging from red to green, covering 0 to 25 GPG and 0 to 425 PPM. All 100 strips are protected by FreshSeal technology across a ready-to-use bottle and two sealed pouches for long-term accuracy. Each purchase also funds a full year of clean water for someone in the Central African Republic.
Check On AmazonIf you click this link and buy, we earn a commission at no additional cost to you.
Drain and Electrical: The Two Requirements That Catch People Off Guard
A water softener needs a drain connection for regeneration cycles. Every few days, the control head runs a backwash and brine rinse cycle that flushes the resin bed and sends several gallons of wastewater down the drain. That water needs somewhere to go, and the connection point needs to meet a few requirements that are easy to overlook during planning.
- Air gap at the drain end: The drain hose end must be positioned above the opening of the drain, not inserted into it. This gap prevents backflow from the drain into the softener during a rinse cycle.
- Drain hose length limits: Most manufacturers specify a maximum total drain hose run of around 20 feet, with no more than 8 feet of horizontal distance before the hose drops to the drain. Runs longer than this restrict flow during backwash, which can leave residual brine in the resin tank and produce salty-tasting water after regeneration.
- Minimum drain pipe size: The floor drain, utility sink, or standpipe you connect to should be at least 1.5-inch pipe to handle the backwash flow rate without backing up.
Electrical is more straightforward: a standard 120V grounded outlet within reach of the control head. Extension cords are not an acceptable permanent solution, as they are a code issue in most jurisdictions and a practical problem in any utility space where they become a tripping hazard. One note worth knowing if your home has copper water pipes: installing a plastic bypass valve at the softener connection interrupts the electrical grounding continuity that runs through the copper plumbing. Some municipalities require a grounding jumper installed across the bypass valve to restore that continuity. It is not a universal requirement, but it is worth asking your plumber about before the job is done rather than after an inspection.
For a broader look at how placement fits into the full ownership picture, including what to expect from routine upkeep after the system is running, the practical overview of water softener installation and maintenance covers both phases from start to ongoing care.

This professional-grade liquid cleanser removes iron, manganese, silt, metal particles, and other contaminants that salt leaves behind in your resin bed, valve parts, and beads. Regular use helps extend appliance life, reduce maintenance calls, and maintain consistent water quality across any water softener brand. It is NSF certified to NSF/ANSI/CAN Standard 60 for drinking water additives and is made in the USA, making it safe for families and pets. Apply 4 oz before each regeneration or use with the Pro Products Easy Feeder kit for daily low-dose treatment.
Check On AmazonIf you click this link and buy, we earn a commission at no additional cost to you.
Final Thoughts: The Decisions You Cannot Make After the Pipe Is Cut
Most choices you make during a softener installation can be adjusted later. Programming settings, salt type, resin cleaner schedule: all of that is revisable after the fact. Where the unit sits in your plumbing is not. Once the bypass valve is in and the fittings are connected, moving the softener to a different point in the line means cutting pipe again and rerouting.
Before anything is cut, confirm three things with your plumber: where the outdoor hose bibs branch off the main, where the drain hose will terminate, and whether there is a grounded outlet within reach. Everything else adjusts. Those three do not.
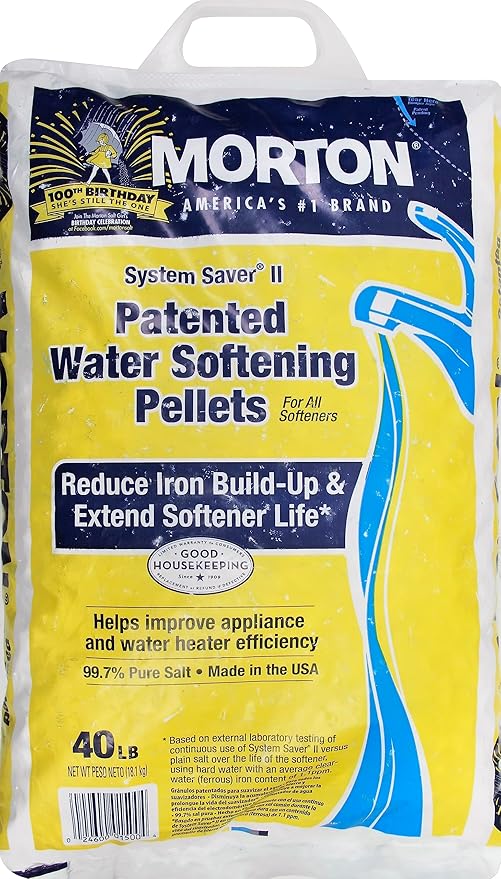
This 40-pound bag of USA-made System Saver pellets is designed to improve the taste of your water while helping extend the life of your appliances and water softener. Simple to use, just add the pellets directly to your softener's brine tank as needed.
Check On AmazonIf you click this link and buy, we earn a commission at no additional cost to you.
FAQs
📍 Does it matter if the water softener goes before or after the water heater?
Yes, it matters. The softener must go before the water heater. If you install it after, the hot water supply does not get treated, which is one of the main reasons most people install a softener in the first place. The hot water side is where scale buildup happens fastest and causes the most damage to appliances and the water heater itself.
🌿 Will soft water kill my grass or garden?
Repeated irrigation with softened water will damage soil and harm plants over time due to sodium accumulation. Outdoor hose bibs and irrigation systems should be plumbed upstream of the softener so they draw from the untreated supply. This is a planning decision made at installation time, not something that can be easily adjusted later.
🏠 Can I install a water softener in my garage?
Yes, in most situations. Garage installations are common and work well in mild climates. The issue is sustained temperatures below 32°F: salt stops dissolving reliably and resin can be damaged by freeze-thaw cycles. If your garage sees real winter temperatures, insulate the unit or find an interior location instead.
🚰 Does a water softener need to be near a floor drain?
It needs access to a drain. A floor drain, utility sink, or laundry standpipe all work. The drain hose run should not exceed about 20 feet total, with no more than 8 feet of horizontal distance before the drop. Longer runs restrict backwash flow and can cause incomplete rinsing, which shows up as salty-tasting water after regeneration cycles.
💧 Where does a water softener go in a home with a well?
After the pressure tank, not before it. The pressure tank and pump pressure switch need to operate on the untreated supply. Install the softener downstream of the pressure tank, on the distribution side, using the same placement rules that apply to city water homes: before the water heater, with outdoor hose bibs upstream of the softener connection.
⚡ What outlet does a water softener require?
A standard 120V grounded outlet within reach of the control head. Do not use an extension cord for a permanent installation: most building codes do not allow it, and it creates a tripping hazard in utility spaces. If there is no outlet nearby, have one added at the time of the softener installation.