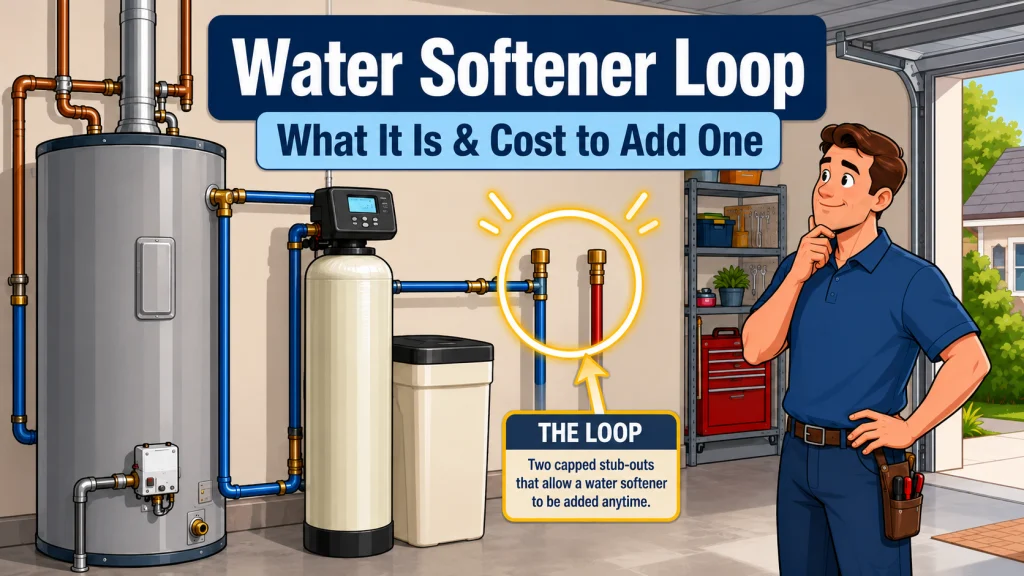
What a Water Softener Loop Actually Is
A water softener loop is a short section of pre-run plumbing installed by the builder during construction. It consists of two capped pipe stub-outs, an inlet and an outlet, positioned near the water heater or a utility area. The idea is simple: instead of cutting into your main supply line at install time, the plumber already did that rough work during the build. When you are ready to add a softener, you connect to those stubs, and the hard part of the job is already behind you.
The loop typically terminates in a garage or dedicated utility room, near a floor drain and a standard 120V outlet. A well-designed loop gives you everything a softener installation requires in one location: pipe access, drain access, and power. It should also route outdoor hose bibs and irrigation upstream of the connection point, so softened water never reaches your lawn or garden. That placement detail matters more than most people realize, and I go into the reasons in the article on where to position a water softener in your home’s plumbing.
Without a loop, adding a water softener means picking a location on the main cold water supply line, making two cuts, installing a bypass valve into that gap with push-fit or soldered fittings, running a drain line to the nearest acceptable drain, and confirming the whole setup ends up in the right spot relative to the water heater. With a loop, you skip the pipe-cutting half of that entirely. The stub-outs are already there, already in the right spot, already near a drain. You connect and move on.
Field Note: The first time I worked in a home with a properly installed loop, the water connections were done in under 20 minutes. The next three installs that month were standard cut-and-connect jobs, each running two hours or more. The loop is not a premium feature. It is just a builder deciding to plan ahead instead of making the homeowner deal with it later.
How to Tell If Your Home Already Has One
Start in the garage or utility room near the water heater. Look for two capped 3/4-inch pipe stub-outs coming out of the wall at roughly hip height, often copper or PEX, positioned close together. Some builders label them clearly: “water softener loop,” “WS loop,” or something similar. Others cap them and move on with no label at all. If you see a paired set of capped pipes in a utility area that does not obviously feed any fixture, that is what you are looking at.
If you are not sure, check the original build documents or the home listing if you bought recently. Builders in markets where loops are standard sometimes note them in the spec sheet, though that is inconsistent. A home inspection report will occasionally flag a pre-plumbed loop as a feature. If the home is new construction and you have not closed yet, ask the builder directly. It is a straightforward question and you will get a straightforward answer.
- Look near the water heater or utility area for two capped 3/4-inch stub-outs, one for inlet and one for outlet.
- Check for labeling: “WS loop,” “water softener loop,” or similar. Not all builders label, so look even without a label.
- Review the builder spec sheet or home inspection report. Some inspectors note a pre-plumbed loop as a feature worth calling out.
- A practical softener-ready location should also have a nearby drain and accessible 120-volt outlet. These are not part of the loop itself, but you will need both to complete the installation.
- Check whether outdoor hose bibs are already on a separate cold water branch. If outdoor lines branch off before the utility area, the builder may have planned a softener connection nearby, even if it was never labeled.
New construction buyers are in the best position here. Asking the builder to include a water softener loop during construction costs a fraction of what a retrofit costs later. From what I have seen, a $100-200 line item at build time consistently saves $500-700 when you go to install the softener two years down the road. If you are buying new and you are in a hard water area, it is worth asking before you sign.

This kit lets you test drinking water, pool water, or any water source in seconds using a simple dip-and-read method with an oversized color chart ranging from red to green, covering 0 to 25 GPG and 0 to 425 PPM. All 100 strips are protected by FreshSeal technology across a ready-to-use bottle and two sealed pouches for long-term accuracy. Each purchase also funds a full year of clean water for someone in the Central African Republic.
Check On AmazonIf you click this link and buy, we earn a commission at no additional cost to you.
What People Mistake for a Water Softener Loop
Garages and utility rooms tend to collect capped pipes that look similar to each other. A single capped stub-out is not a loop. A water softener loop has two nearby connections, inlet and outlet, both tying into the main cold water supply line. One pipe by itself is more likely an old irrigation branch, a capped washing machine hot line, or a hose bib extension that was never used. The paired arrangement is the tell.
The temperature and pressure relief discharge pipe on your water heater is another one that throws people off. It is often copper and usually runs down the side of the water heater toward the floor or a drain area. It is not a softener loop. It is a safety valve discharge, and connecting anything to it would be a serious mistake. Trace any pipe you are unsure about back to where it originates before assuming it is part of a softener connection.
If you find two nearby capped pipes but are not certain they connect to the main cold water supply line, the confirmation test is straightforward. Turn off the main water shutoff, relieve pressure in the system by opening a faucet, then carefully remove one cap and check whether water drains out once pressure is released. If there is no water flow at all and the pipe feels completely dry, it may not be connected to the main line. A plumber can confirm in a few minutes during a site visit if you want to be sure before buying a softener.
California Has Them. Most of the Country Does Not.
California is the outlier. In parts of California, especially Southern California and the Central Valley where water hardness commonly runs 15 to 25 GPG, some water districts require softener-ready plumbing and many builders commonly include loops in new construction. Homes built after the late 1990s in those areas are more likely to have one. If you live in California and are planning a softener installation, it is worth checking for a loop before you start planning the pipe work, because there is a real chance you do not need to do any.
Outside California, loops show up in newer construction in hard water states like Arizona, Nevada, and parts of Texas, but there is no equivalent requirement driving it. In those markets it depends on the builder and the subdivision. Higher-end developments and custom construction are more likely to include one. Standard builder-grade subdivisions completed before the mid-2010s are less consistent. In the Midwest, Northeast, and Southeast, loops are uncommon in existing housing stock. If you own a home built before 2000 outside California, it is less likely to have one unless it was custom-built or previously set up for a softener by a prior owner.
| Region | Loop Prevalence | What to Expect |
|---|---|---|
| Southern California / Central Valley | Common, often required or standard practice in hard-water districts | Many newer homes post-late 1990s are more likely to have one. Check before assuming you need a full retrofit. |
| Arizona, Nevada, parts of Texas | Present in some newer builds | Depends on builder and subdivision. Higher-end construction more likely. Not consistent. |
| Midwest and Northeast | Uncommon outside custom builds | Most homes require standard installation with full pipe access work. |
| Southeast | Rare | Water hardness varies widely by county. Loops appear mostly in custom construction. |
For anyone working through the broader decision of what water softener installation actually involves, the overview of water softener installation and maintenance covers the full scope from initial pipe work through long-term upkeep, including how loop availability changes the planning picture.

This push-fit ball valve joins copper, CPVC, and PEX pipe in any combination in under a minute with no soldering, clamps, unions, or glue required. Stainless steel teeth grip the pipe on insertion while a specially formulated O-ring creates a leak-free seal, and an integrated tube liner for PEX installations eliminates loose components for a secure, reliable connection. Fittings can be rotated after assembly for easier installation in tight spaces and disconnected just as quickly using a simple disconnect tool, making them fully reusable.
Check On AmazonIf you click this link and buy, we earn a commission at no additional cost to you.
What It Costs to Add a Loop If Your Home Does Not Have One
Retrofitting a water softener loop runs $200-800 in most markets. The range comes down to two variables: how accessible your main cold water supply line is and how close the target utility location is to a drain. A garage where the main line runs along an open stud wall is a two-hour job at the low end of that range. A finished basement with the main line behind drywall adds time for access and patching and pushes toward the higher end. A plumber can usually complete a straightforward loop addition in two to four hours.
The drain situation matters more than most people factor in. If a floor drain is already in the utility area, the drain connection is a short run and adds nothing significant to the cost. If the nearest acceptable drain requires a long horizontal run or routing through finished space, that adds both material cost and labor time. Ask the plumber to confirm the drain situation before agreeing to a price, because that is the variable most likely to cause cost surprises.
For homeowners who are comfortable with basic plumbing, adding a loop is a reasonable DIY project. You are doing a simplified version of what a full softener installation requires: tapping the main line, fitting a bypass segment with shutoff valves, and routing stub-outs to a utility location near a drain. If you are already planning to handle the softener installation yourself, adding the loop in the same session makes sense. The complete steps are in the guide on how to install a water softener yourself, which covers both the loop connection and the full installation sequence.
Before buying a softener, check for the loop first. It affects how much installation work you need, whether doing it yourself is realistic, and how much of your budget should go toward plumbing instead of the unit itself. A five-minute inspection of your utility area before you order anything can save you from planning the wrong job.
Note: If you are having a plumber add a loop, confirm that outdoor hose bibs and irrigation lines are upstream of the new connection point. A loop that routes softened water to the yard is worse than no loop. Sodium builds up in soil over time and causes real damage to grass and plants, which is one of the things I see repeat across installs in areas where this was not thought through at build time.

This whole-home water softener comes pre-loaded with 1.5 cubic feet of high capacity resin in a black USA-made mineral tank, paired with a USA brine tank featuring a safety float. The on-demand digital metered system ensures efficient water treatment, and the included 1-inch Noryl plastic bypass valve makes installation straightforward. Toll-free customer support is available whenever you need help.
Check On AmazonIf you click this link and buy, we earn a commission at no additional cost to you.
Final Thoughts: The Loop Helps, but the Installation Works Either Way
A water softener loop is a convenience, not a requirement. Homes with one make installation faster and cleaner. Homes without one require more pipe work, but that pipe work is straightforward and well within the scope of a half-day DIY project or a standard plumber visit. The loop removes friction. It does not change whether a softener can be installed.
What does matter is knowing your situation before you start planning. If your home has a loop and you do not know it, you are budgeting for work you do not need to do. If your home does not have one and you are considering adding it, the $200-800 retrofit cost makes sense if you are staying in the home for several years, because it also makes future service work and any eventual replacement faster. If you are doing a one-time installation and the home is already accessible, skip the retrofit and run the standard installation.
The full picture of what water softener installation involves, including cost breakdown, DIY versus plumber considerations, and what the job actually looks like from start to finish, is in the complete water softener installation guide.

This digital metered system comes pre-loaded with 1.5 cubic feet of 10% crosslink resin in a 10 by 54-inch black mineral tank, paired with a square brine tank featuring a safety float and salt grid for easy setup. High crosslink resin delivers improved chlorine resistance and longer service life, while the on-demand Fleck 5800 valve regenerates only when needed for maximum efficiency. With a 12 GPM service flow rate and 28 GPM peak capacity, it is well suited for households of up to 6 people with moderate to hard water.
Check On AmazonIf you click this link and buy, we earn a commission at no additional cost to you.
FAQs
🏠 Do all new homes have a water softener loop?
No. Some California water districts require softener-ready plumbing, and many builders there commonly include loops in newer construction. Outside California it depends on the builder and region. Check your utility area for two capped 3/4-inch stub-outs near the water heater, or ask your builder if the home is newer construction.
🔍 How do I find a water softener loop in my house?
Check the garage or utility area near the water heater for two capped 3/4-inch pipes close together. They may be labeled “WS loop” or not labeled at all. The key sign is the pair: a single capped pipe is usually something else entirely.
💰 How much does it cost to add a water softener loop?
Typically $200-800 depending on how accessible your main supply line is and how close the utility area is to a drain. Most plumbers complete the work in two to four hours. An open main line and nearby floor drain keep costs toward the lower end of that range.
🌿 Should softened water go to outdoor hose bibs?
No. Outdoor hose bibs and irrigation should be upstream of the softener, not downstream. Softened water contains sodium that accumulates in soil over time and damages plants and grass. A properly installed loop keeps outdoor lines on untreated water.
🔧 Can I add a water softener loop myself?
Yes, if you are comfortable with basic pipe work. It involves tapping the main cold water line, installing a short bypass segment with shutoff valves, and routing stub-outs to a location near a drain. It is essentially a stripped-down version of the softener installation itself.
📋 Does a water softener loop show up on a home inspection?
Sometimes. Some inspectors note a pre-plumbed loop as a feature in the report. It is not consistent across inspectors, so do not rely on the inspection alone. Check the utility area yourself and review the builder spec sheet if you have it.